
**LoopAnalyzer Manual**
**Key Mapping**
Before you get started, be sure to configure **Key Mapping** by selecting SET
1. **Standard Key Mapping** (plays one loop at a time)
– **Q** – Loop 1
– **W** – Loop 2
– **E** – Loop 3
– **A, S, D, Y, X, C** – Additional Loops
> Press **SET** and select **Key Mapping** to customize any of these keys.
2. **DUB Mode Mapping** (start/restart multiple loops simultaneously)
– **1** – Master Loop (same as **Q** in standard mode)
– **Q, W, E, A, S, D, Y, X, C** – Additional Loops
> In DUB Mode, you can stack multiple loops playing at once.
—
**Key Features**
– **Loop Detection**: Automatically identify loops in any audio track.
– **Live Playback**: Trigger loops directly using keyboard keys.
– **Recording**: Capture live sessions as high-quality WAV files (full version only).
– **Export**: Save loops
– **Adjustable Key Mapping**: Reassign keyboard shortcuts to suit your workflow.
—
**Interface Overview**
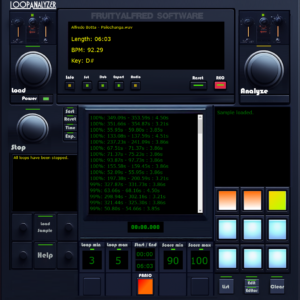
LoopAnalyzer is divided into several panels:
1. **Main Controls**: Load, analyze, and manage audio tracks.
2. **Loop List**: Displays detected loops with details like start/end times and durations.
3. **Pad Section**: Assign loops to virtual pads (using F1–F9 keys) for live playback.
4. **Status Display**: Shows file and loop information
—
**Essential Settings**
These impact loop detection the most and appear in the **middle bottom** of LoopAnalyzer:
– **Loop min**: Minimum loop length (in seconds).
– **Loop max**: Maximum loop length (in seconds). Cannot be smaller than Loop min.
– **Start / End**: The specific track range you want to analyze. Useful for focusing on a certain segment of your audio.
– **Score min (50)**: Minimum detection quality. Lowering this may reveal more or “interesting” loops.
– **Score max (100)**: Maximum detection quality.
> You can analyze a track multiple times with different settings to uncover a wide variety of loops.
—
**Basic Handling**
1. **Load a Track**
– Use **Load** to import an audio file for analysis.
2. **Find Loops**
– Click **Analyze** to detect loops in the loaded track.
– The **Loop List** then displays start time, end time, duration, and more.
3. **Virtual Pads**
– Assign loops to pads (using F1–F9) for live playback.
4. **Settings Menu**
– Customize detection parameters, key mapping, export options, Dub Mode, and audio device settings.
5. **Reset**
– Restores default detection parameters.
6. **Rec Button** (full version)
– Start/stop live recording of loop performances.
7. **Stop Button**
– Stops any loop currently playing.
—
**Loop List Section** (Middle Display, “little buttons”)
– **Sort**: Filters loops by length relative to a selected loop.
– **Reset**: Reverts to the full, unfiltered loop list.
– **Time**: Filters loops by time in track (+/- 5 sec) relative to the selected loop.
– **Exp.**: Opens export options for multiple loops.
—
**Status Display Section** (Left Display)
– Shows file and loop details.
– **Load Sample**: Load external audio into pads (60 sec limit).
– **Help**: Access this manual at any time.
—
**Pad Section** (Bottom Right)
– **List**: Shows all loops assigned to pads.
– **Edit**: Delete a loop on a specific pad.
– **Editor**: Edit a loop’s start/end times, fade in/out.
– **Clear**: Deletes all loops from all pads.
—
**Panic Button**
– Resets the application to its default state, clearing **all** loops from **all** slots.
– Audio device and keymap remain unchanged (unless otherwise noted).
—
**Using LoopAnalyzer**
**Loading and Analyzing Tracks**
1. Click **Load** to import a track (WAV, MP3, AIFF).
2. Check your detection settings and click **Analyze**.
3. The software calculates BPM, average musical key, and potential loops.
4. View loops in the **Loop List** with start/end times and durations.
—
**Switching Between Loop Play Modes**
1. **Standard Mode** (default): Plays one loop at a time.
2. **Dub Mode**: Enable in Settings. Lets you stack multiple loops simultaneously.
—
**Assigning Loops to Virtual Pads**
1. Select a loop in the **Loop List**.
2. Press **F1–F9** to place the loop on a pad.
3. You can assign loops from different tracks to different pads (e.g., Track A loops on Pad F1–F3, Track B loops on Pad F4–F5, etc.).
—
**Playing Loops Live**
1. **Standard Mode**:
– Press **Q W E A S D Y X C** (or your custom mapping) to play loops you loaded into Pads earlier.
– One loop plays until another key is pressed. Pressing the same key restarts the loop.
2. **Dub Mode**:
– Multiple loops can be triggered simultaneously.
– **Key “1”** acts as the master loop; pressing it again restarts or stops that master loop. (needed for bpm / beat matching in later version)
– Other keys (**Q, W, E, A, S, D, Y, X, C**) can each start an additional loop. Pressing a key a second time restarts the loop.
– **Shift + [key]** stops that loop.
– Key mapping can be changed under Settings.
—
**Editing Loops**
1. Click **Editor** (beneath Pad section) for the chosen pad.
2. Modify loop start/end times, fade in/out.
3. Click **SAVE** to finalize changes.
—
**Recording Sessions (Full Version)**
1. Select a **loopback-enabled audio device** in Settings, then click **Save Settings**.
2. Click **Rec** to begin recording your live loop performance.
3. Stop the recording by clicking **Rec** again.
4. The session is saved as a WAV file in a location you specify.
—
**Exporting Loops**
1. Open the **Export Settings** menu.
2. Choose the filters:
– **Minimum Loop Length**
– **Loop Score** range
– **Export only saved Loops** (from the pads)
3. Double-click or press **ENTER** on a loop in the list to export.
– The exported loop is saved in the same folder as the original audio.
—
**Advanced Features**
**Customizing Detection Settings**
1. Open **Settings**.
2. Adjust parameters like:
– **Acceptable Note Deviation**: Controls pitch difference sensitivity.
– **Loudness Difference**: Filters loops by volume variations.
**Loop Volume Control (Dub Mode Only)**
1. Select a loop on a pad (F1–F9).
2. Use **+ / -** to raise or lower that loop’s volume.
3. Return to Standard Mode anytime; the adjusted volumes stay in effect.
—
**FAQs and Troubleshooting**
– **Why can’t I detect loops?**
– Raise or lower detection sensitivity. Experiment with **min**/**max** loop length and detection score.
– **Recording issues?**
– Make sure you’ve selected a **loopback device** in Settings. Check your audio driver for updates.
– **Loops not exporting?**
– Ensure your export settings align with the loops you want (e.g., length, score, or assigned pads).
– **Assign loops from multiple tracks?**
– Yes. Load different tracks, analyze each, and assign loops to any free pads (F1–F9).
—
**Enjoy exploring loops and live creativity with LoopAnalyzer!**